
In the past, when setting up blogs or CMS websites, most people opted for dynamic CMS systems based on PHP and MySQL, such as WordPress, Typecho, or Zblog. While these traditional programs offer mature features and user-friendly visual interfaces, they present a host of issues for personal blogs—including high costs, maintenance hassles, poor performance, and security vulnerabilities.
The problem with such systems is that they require server support for PHP and MySQL, leading to higher hosting costs. Furthermore, PHP applications are prone to vulnerabilities—making them easy targets for malware injection or SQL injection attacks—and often struggle with high traffic, resulting in bottlenecks, lag, or error messages.
Consequently, many have turned to static site generators like Hugo to build their blogs or CMS sites. However, since Hugo lacks a native Markdown writing interface, users typically need a third-party CMS system to handle content creation and management.
Beginners often choose to write Markdown articles in Obsidian, setting up the vault within the Hugo site directory and using various publishing plugins to push content to GitHub. Yet, in practice, this approach proves cumbersome: the configuration is complex, there are numerous pitfalls and persistent bugs, and troubleshooting relies entirely on the user’s own online research.
In the current AI era, however, there is a much simpler, user-friendly solution for creating a free CMS website. Comparative testing shows that the combination of VS Code + Front Matter CMS + Hugo + GitHub is the ideal choice for beginners—offering stability and a hassle-free experience at no cost.
I. How It Works
The overall logic is straightforward: install the Front Matter CMS extension in VS Code to automatically handle article front-matter configuration while you write Markdown content directly. Once finished, commit and push your code to a GitHub repository. The repository then triggers GitHub Actions, which automatically compile the site into static web pages in the cloud. Finally, GitHub Pages hosts the site for public access.
In short, you simply focus on creating content, while the tools automatically handle configuration, compilation, and deployment.
II. Preparing the Environment
You only need to prepare three software applications on your local computer; default installations are sufficient, so there is no need for complex custom settings.
The first is Git, used for version control; it allows you to commit and synchronize the articles you write locally to GitHub.
The second is VS Code, the editor where you will primarily write articles and modify various configurations. Besides VS Code, you can also use other editor-based tools such as TRAE, Qoder, CodeBuddy, Antigravity, etc.
The third tool is Hugo; make sure to download the “Extended” version. You will primarily use it to create new sites and preview your blog locally. The actual site compilation for deployment runs on GitHub’s servers, so the process continues uninterrupted even if you turn off your computer.
III. Initialize the Hugo Blog Project and Link to a GitHub Repository
- Create a Hugo site locally
Open your terminal and execute the following commands line by line to generate the complete Hugo blog directory.
Create the blog site folder
hugo new site my-blog
Enter the project directory
cd my-blog
Initialize the git repository
git init
Install the minimalist theme “PaperMod”
git submodule add https://github.com/adityatelange/hugo-PaperMod.git themes/PaperMod
- Modify basic configuration
Navigate to the generated project folder, locate hugo.toml, and paste the following content into it. Remember to update the URL to match your GitHub username and repository name.
baseURL = ‘https://your-username.github.io/repository-name/‘
locale = ‘zh-cn’
title = ‘Personal Tech Blog’
theme = “PaperMod”
- Link to the remote GitHub repository
First, open GitHub in your browser and manually create a new, empty repository. Do not select options like README or License.
Return to the terminal and execute the following code to push all local files to the newly created GitHub repository.
git add .
git commit -m “Initialize Hugo blog project”
git remote add origin your-repository-url
git push origin main
IV. Core VS Code Configuration: Setting up a Local CMS with the “Front Matter CMS” Extension
This step is the core of this workflow; it allows you to manage articles using an extension instead of manually writing lengthy configuration headers for every post.
- Install the extension
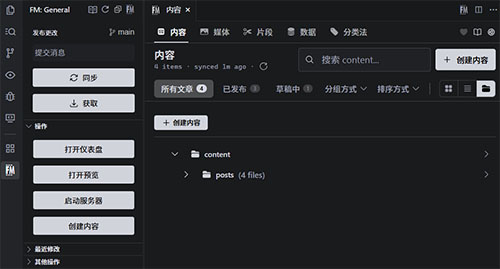
Open the VS Code Extensions Marketplace and search for “Front Matter CMS”. Make sure to select the official stable version rather than the BETA version; the stable version offers all the functionality you need. 2. Plugin Initialization (Hugo Compatibility)
Open the root directory of your blog project in VS Code (you must open the root directory, not a subfolder). Click the Front Matter CMS icon on the left sidebar to launch the initialization wizard. Select “Hugo” as the framework and set the content directory to content/posts.
V. Configuring GitHub Actions for Automated Deployment
Once configured, simply pushing your code to GitHub will automatically build and update the site, eliminating the need for manual packaging.
- Open your GitHub repository page and navigate to Settings → Pages;
- Under the Deployment source option, select GitHub Actions;
- Choose to browse workflow templates, search for “Hugo,” select the official Hugo template, and click Configure;
- Save the file; this writes the workflow configuration to the repository and activates automatic deployment.
VI. Daily Workflow: Writing and Publishing Articles
Once the environment is fully set up, writing blog posts is straightforward and involves just a few steps:
- Open the Front Matter panel and click to create a new article. The plugin automatically generates the necessary Hugo front matter, pre-filling the title, date, tags, and draft status.
- Write the Markdown content in VS Code. You can drag and drop images directly into the editor; the plugin automatically saves the images and generates the corresponding access links.
- After writing and reviewing the content, change
draft: truetodraft: falsein the article’s front matter if you wish to publish it. Adraft: truesetting indicates a draft, meaning Hugo will not build the article for the live site. - Use VS Code’s Git features to commit your changes and push them to the remote GitHub repository.
- Wait for GitHub Actions to execute the build; the live site is usually updated within a minute.
If you encounter issues like configuration errors, rendering anomalies, or deployment failures, there is no need to scour forums for solutions. Simply copy the error message and paste it into VS Code’s built-in AI; ask it to identify the problem and adjust the configuration—most issues can be resolved quickly this way.